

-


移动开发
站-
热门城市 全国站>
-
其他省市
-
-

 15692118659
 白羽
2018-06-07
来源 :网络
阅读 1335
评论 0
白羽
2018-06-07
来源 :网络
阅读 1335
评论 0
摘要:对于学习Android系统源代码,也没什么大概,就从我们平常使用最基础的东西学起,也就是从view这个切入点开始学习Android的源码,在没分析源码之前,我们有的时候会碰到一些眼熟的单词,如Window、PhoneWindow、DecorView、ViewGroup等等名词,虽然不知道它们都包含什么意思,但是经常会碰到,接下来我们便一一了解这些名词。首先我们从最常用的部分-setContentView学起。
学习工具
//开发工具
1、AndroidStudio

Android Studio 2.2.3
Build #AI-145.3537739, builton December 2, 2016
JRE: 1.8.0_112-release-b05x86_64
JVM: OpenJDK 64-BitServer VM byJetBrains s.r.o

//源码环境
2、AndroidAPI -25
compileSdkVersion 25
buildToolsVersion "25.0.2"
开始学习
首先我们从最常见的setContentView开始分析源码。
@Override
protected voidonCreate(Bundle savedInstanceState){
super.onCreate(savedInstanceState);
//最常见的开始分析,进入详细代码
setContentView(R.layout.activity_set_content_view_learn);
}
进入到了详细代码中我们会发现其实我们进入到了activity类代码中了。
//代码清单Activity.java

/**
* Set the activity content from a layout resource.  The resource will be
* inflated, adding all top-level views to the activity.
*
* @param layoutResID Resource ID to be inflated.
*
* @see #setContentView(android.view.View)
* @see #setContentView(android.view.View, android.view.ViewGroup.LayoutParams)
*/
public void setContentView(@LayoutRes int layoutResID) {

//调用Window类中的方法setContentView。
getWindow().setContentView(layoutResID);

//无关代码,初始化actionBar相关东东...
initWindowDecorActionBar();
}
首先我们会发现,我们先调用getWindow获取window对象,然后再调用Window类中的setContentView方法,我们可以发现Window类其实是一个抽象类,所以肯定会有它的实现类,在这里,它的实现类就是PhoneWindow类。在这里,我们终于碰到了一个经常会提到的类PhoneWindow。
//代码清单 抽象类Window
public abstract classWindow{
//省略相关代码...
}

//代码清单 Window实现类,PhoneWindow
public classPhoneWindowextendsWindowimplementsMenuBuilder.Callback{
//省略相关代码...
}
从上面的类申明当中我们就可以发现,PhoneWindow类其实是抽象类Window的实现类,所以对于setContentView方法,其实我们就得到它的实现类PhoneWindow中去查看。
//代码清单 PhoneWindow.java

// This is the view in which the window contents are placed. It is either mDecor itself, or a child of mDecor where the contents go.

//变量申明
ViewGroup mContentParent;

@Override
public voidsetContentView(intlayoutResID){
// Note:FEATURE_CONTENT_TRANSITIONS may be set in the process of installing the window
// decor, when theme attributes and the like are crystalized. Do not check the feature
// before this happens.
if (mContentParent == null) {
installDecor();
} else if (!hasFeature(FEATURE_CONTENT_TRANSITIONS)) {
mContentParent.removeAllViews();
}

if (hasFeature(FEATURE_CONTENT_TRANSITIONS)) {
final Scene newScene = Scene.getSceneForLayout(mContentParent, layoutResID,
getContext());
transitionTo(newScene);
} else {
mLayoutInflater.inflate(layoutResID, mContentParent);
}
mContentParent.requestApplyInsets();
final Callback cb = getCallback();
if (cb != null && !isDestroyed()) {
cb.onContentChanged();
}
mContentParentExplicitlySet = true;
}
在PhoneWindow这个具体的实现类中,我们可以看到的流程是首先判断mContentParent是不是等于null,是的话就加在installDecor()方法,不是的话再判断是否使用了这个FEATURE_CONTENT_TRANSITIONS的flag,如果 没有的 话则mContentParent删除其中所有的view。接下来再判断是否需要通过LayoutInflater.inflate将我们传入的layout放置到mContentParent中。
其实我们可以稍微预测下installDecor()的功能,大概就是初始化mContentParent这个变量。而mContentParent这个变量就是包裹我们设置的整个xml布局内容的ViewGroup。
最后就是调用了一个接口Callback里面的方法。我们可以发现其实Activity实现了这个接口,但是onContentChanged这个接口方法在Activity中是一个空实现,这不是重点。
接下来,我们继续研究installDecor()中的源码~
//代码清单 PhoneWindow中的installDecor方法

//申明变量
// This is the top-level view of the window, containing the window decor.
private DecorView mDecor;

private voidinstallDecor(){
mForceDecorInstall = false;
if (mDecor == null) {
mDecor = generateDecor(-1);
mDecor.setDescendantFocusability(ViewGroup.FOCUS_AFTER_DESCENDANTS);
mDecor.setIsRootNamespace(true);
//省略无关代码...
} else {
mDecor.setWindow(this);
}
if (mContentParent == null) {
mContentParent = generateLayout(mDecor);

//省略无关代码...
} else {
mTitleView = (TextView) findViewById(R.id.title);
//设置是否需要标题
if (mTitleView != null) {
if ((getLocalFeatures() & (1 << FEATURE_NO_TITLE)) != 0) {
final View titleContainer = findViewById(R.id.title_container);
if (titleContainer != null) {
titleContainer.setVisibility(View.GONE);
} else {
mTitleView.setVisibility(View.GONE);
}
mContentParent.setForeground(null);
} else {
mTitleView.setText(mTitle);
}
}
}

//省略无关代码...

}
}
从上面代码我们可以看出大概的流程。首先通过generateDecor(-1)来初始化一下mDecor,这个mDecor是DecorView的对象,看吧,这里面已经出现了这个常见名词,等等我们来分析一下DecorView这个类的作用。
接下来,我们用mDecor这个对象通过generateLayout(mDecor)来初始化mContentParent这个对象。然后我们便可以通过findViewById这个方法来获取相关的控件了。
//代码清单 window.java类获取相关控件

@Nullable
public View findViewById(@IdRes int id) {
return getDecorView().findViewById(id);
}
在这里的getDecorView()方法其实就是获取mDecor这个对象。接下来我们开始分析DecorView这个类。入口点就是我们刚刚在installDecor方法中初始化mDecor这个对象的地方mDecor = generateDecor(-1)。
//代码清单 DecorView.java类

protected DecorView generateDecor(int featureId) {

Context context;
//没什么鸟用的无关代码,省略...
return new DecorView(context, featureId, this, getAttributes());
}
从generateDecor中我们没发现什么有用的东西,我们继续分析相关代码。接下来我们分析mContentParent = generateLayout(mDecor);
从这个方法名便能看出个大概了,它是生成布局,然后赋值给mContentParent,我们进入到方法中详细了解一下整个布局生成过程。
//代码清单 generateLayout方法流程

protected ViewGroup generateLayout(DecorView decor) {
// Apply data from current theme.

//设置当前activity的theme
TypedArray a = getWindowStyle();

//省略无关代码...
//首先通过WindowStyle中设置的各种属性,对Window进行requestFeat
mIsFloating = a.getBoolean(R.styleable.Window_windowIsFloating, false);
int flagsToUpdate = (FLAG_LAYOUT_IN_SCREEN|FLAG_LAYOUT_INSET_DECOR)
& (~getForcedWindowFlags());
if (mIsFloating) {
setLayout(WRAP_CONTENT, WRAP_CONTENT);
setFlags(0, flagsToUpdate);
} else {
setFlags(FLAG_LAYOUT_IN_SCREEN|FLAG_LAYOUT_INSET_DECOR, flagsToUpdate);
}

//省略无关代码...
//根据feature来加载对应的xml布局文件
int layoutResource;
int features = getLocalFeatures();
// System.out.println("Features: 0x" + Integer.toHexString(features));
if ((features & (1 << FEATURE_SWIPE_TO_DISMISS)) != 0) {
layoutResource = R.layout.screen_swipe_dismiss;
} else if ((features & ((1 << FEATURE_LEFT_ICON) | (1 << FEATURE_RIGHT_ICON))) != 0) {
if (mIsFloating) {
TypedValue res = new TypedValue();
getContext().getTheme().resolveAttribute(
R.attr.dialogTitleIconsDecorLayout, res, true);
layoutResource = res.resourceId;
} else {
layoutResource = R.layout.screen_title_icons;
}
// XXX Remove this once action bar supports these features.
removeFeature(FEATURE_ACTION_BAR);
// System.out.println("Title Icons!");
} else if ((features & ((1 << FEATURE_PROGRESS) | (1 << FEATURE_INDETERMINATE_PROGRESS))) != 0
&& (features & (1 << FEATURE_ACTION_BAR)) == 0) {
// Special case for a window with only a progress bar (and title).
// XXX Need to have a no-title version of embedded windows.
layoutResource = R.layout.screen_progress;
// System.out.println("Progress!");
} else if ((features & (1 << FEATURE_CUSTOM_TITLE)) != 0) {
// Special case for a window with a custom title.
// If the window is floating, we need a dialog layout
if (mIsFloating) {
TypedValue res = new TypedValue();
getContext().getTheme().resolveAttribute(
R.attr.dialogCustomTitleDecorLayout, res, true);
layoutResource = res.resourceId;
} else {
layoutResource = R.layout.screen_custom_title;
}
// XXX Remove this once action bar supports these features.
removeFeature(FEATURE_ACTION_BAR);
} else if ((features & (1 << FEATURE_NO_TITLE)) == 0) {
// If no other features and not embedded, only need a title.
// If the window is floating, we need a dialog layout
if (mIsFloating) {
TypedValue res = new TypedValue();
getContext().getTheme().resolveAttribute(
R.attr.dialogTitleDecorLayout, res, true);
layoutResource = res.resourceId;
} else if ((features & (1 << FEATURE_ACTION_BAR)) != 0) {
layoutResource = a.getResourceId(
R.styleable.Window_windowActionBarFullscreenDecorLayout,
R.layout.screen_action_bar);
} else {
layoutResource = R.layout.screen_title;
}
// System.out.println("Title!");
} else if ((features & (1 << FEATURE_ACTION_MODE_OVERLAY)) != 0) {
layoutResource = R.layout.screen_simple_overlay_action_mode;
} else {
// Embedded, so no decoration is needed.
layoutResource = R.layout.screen_simple;
// System.out.println("Simple!");
}
//将上面获取到的xml布局加载到mDecor对象中
mDecor.startChanging();
mDecor.onResourcesLoaded(mLayoutInflater, layoutResource);

ViewGroup contentParent = (ViewGroup)findViewById(ID_ANDROID_CONTENT);
if (contentParent == null) {
throw new RuntimeException("Window couldn't find content container view");
}

if ((features & (1 << FEATURE_INDETERMINATE_PROGRESS)) != 0) {
ProgressBar progress = getCircularProgressBar(false);
if (progress != null) {
progress.setIndeterminate(true);
}
}

if ((features & (1 << FEATURE_SWIPE_TO_DISMISS)) != 0) {
registerSwipeCallbacks();
}

// Remaining setup -- of background and title -- that only applies
// to top-level windows.
if (getContainer() == null) {
final Drawable background;
if (mBackgroundResource != 0) {
background = getContext().getDrawable(mBackgroundResource);
} else {
background = mBackgroundDrawable;
}
mDecor.setWindowBackground(background);

final Drawable frame;
if (mFrameResource != 0) {frame = getContext().getDrawable(mFrameResource);
} else {frame = null;
}
mDecor.setWindowFrame(frame);

mDecor.setElevation(mElevation);
mDecor.setClipToOutline(mClipToOutline);

if (mTitle != null) {
setTitle(mTitle);
}

if (mTitleColor == 0) {
mTitleColor = mTextColor;
}
setTitleColor(mTitleColor);
}

mDecor.finishChanging();

return contentParent;
}
上面这个方法流程我们能看出个大概,首先getWindowStyle在当前的Window的theme中获取我们的Window中定义的属性。然后就根据这些属性的值,对我们的Window进行各种requestFeature,setFlags等等。
还记得我们平时写应用Activity时设置的theme或者feature吗(全屏啥的,NoTitle等)?我们一般是不是通过XML的android:theme属性或者java的requestFeature()方法来设置的呢?譬如:
通过java文件设置:
requestWindowFeature(Window.FEATURE_NO_TITLE);
通过xml文件设置:
android:theme="@android:style/Theme.NoTitleBar"
对的,其实我们平时requestWindowFeature()设置的值就是在这里通过getLocalFeature()获取的;而android:theme属性也是通过这里的getWindowStyle()获取的。
所以这里就是解析我们为Activity设置theme的地方,至于theme一般可以在AndroidManifest里面进行设置。接下来,通过对features和mIsFloating的判断,为layoutResource进行赋值,至于值可以为R.layout.screen_custom_title;R.layout.screen_action_bar;等等。 至于features,除了theme中设置的,我们也可以在Activity的onCreate的setContentView之前进行requestFeature,也解释了,为什么需要在setContentView前调用requestFeature设置全屏什么的。
最后通过我们得到了layoutResource,然后将它加载给mDecor对象,这个mDecor对象其实是一个FrameLayout, 它的中心思想就是根据theme或者我们在setContentView之前设置的Feature来获取对应的xml布局,然后通过mLayoutInflater转化为view,赋值给mDecor对象,这些布局文件中都包含一个id为content的FrameLayout,最后将其引用返回给mContentParent。
//代码清单 xml布局文件,包含id为content的FrameLayout布局
<LinearLayout xmlns:android="//schemas.android.com/apk/res/android"
android:layout_width="match_parent"
android:layout_height="match_parent"
android:fitsSystemWindows="true"
android:orientation="vertical">
<ViewStub android:id="@+id/action_mode_bar_stub"
android:inflatedId="@+id/action_mode_bar"
android:layout="@layout/action_mode_bar"
android:layout_width="match_parent"
android:layout_height="wrap_content"
android:theme="?attr/actionBarTheme" />
<FrameLayout
android:id="@android:id/content"
android:layout_width="match_parent"
android:layout_height="match_parent"
android:foregroundInsidePadding="false"
android:foregroundGravity="fill_horizontal|top"
android:foreground="?android:attr/windowContentOverlay" />
</LinearLayout>
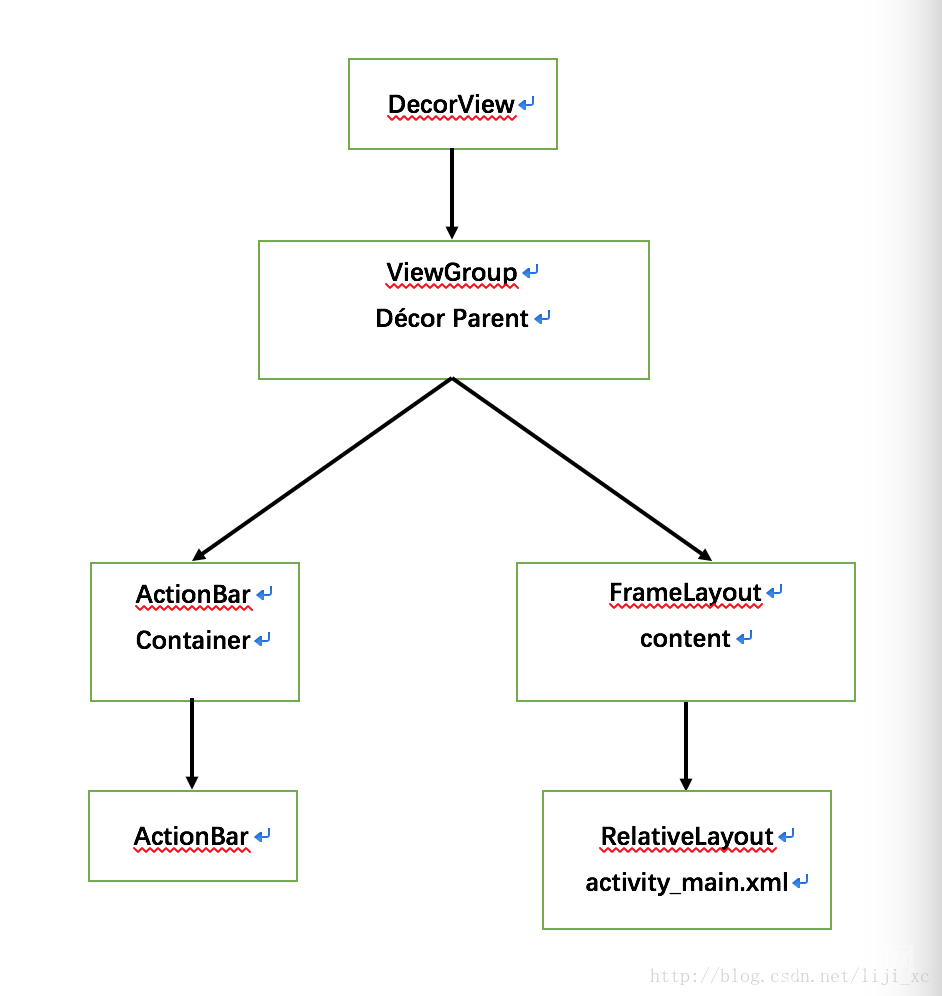
我们用word来画一个简单的示意图
到这里我们分析了生成布局后的大概流程,这样生成了布局后我们接着干吗呢?请回看当初的代码:
//代码清单 PhoneWindow.java
@Override
public voidsetContentView(intlayoutResID){
//我们上面分析的生成系统xml布局的流程
if (mContentParent == null) {
installDecor();
} else if (!hasFeature(FEATURE_CONTENT_TRANSITIONS)) {
mContentParent.removeAllViews();
}
if (hasFeature(FEATURE_CONTENT_TRANSITIONS)) {
final Scene newScene = Scene.getSceneForLayout(mContentParent, layoutResID,
getContext());
transitionTo(newScene);
} else {
//将我们自己写的xml加载到我们上面获取到的里面包含id为content的xml布局中去,并赋值给mContentParent
mLayoutInflater.inflate(layoutResID, mContentParent);
}
//省略无关代码...
}
我们刚刚写了一个系统生成的xml布局就是包含id为content的布局:
<FrameLayout
android:id="@android:id/content"
android:layout_width="match_parent"
android:layout_height="match_parent"
android:foregroundInsidePadding="false"
android:foregroundGravity="fill_horizontal|top"
android:foreground="?android:attr/windowContentOverlay" />
其实这就是我们将自己设置的xml布局装载进这个布局中。这就是整个setContentView所做的工作。
最后我们来总结一下全部流程,用一个图来表示,更方面直接:
首先初始化mDecor,即DecorView为FrameLayout的子类。就是我们整个窗口的根视图了。然后,根据theme中的属性值,选择合适的布局,通过infalter.inflater放入到我们的mDecor中。在这些布局中,一般会包含ActionBar,Title,和一个id为content的FrameLayout。最后,我们在Activity中设置的布局,会通过infalter.inflater压入到我们的id为content的FrameLayout中去。
本文由职坐标整理并发布,希望对同学们有所帮助。了解更多详情请关注职坐标移动开发之Android频道!
 喜欢 | 0
 不喜欢 | 0


您输入的评论内容中包含违禁敏感词
我知道了

请输入正确的手机号码
请输入正确的验证码
您今天的短信下发次数太多了,明天再试试吧!
我们会在第一时间安排职业规划师联系您!
您也可以联系我们的职业规划师咨询:

版权所有 职坐标-IT技术咨询与就业发展一体化服务 沪ICP备13042190号-4
上海海同信息科技有限公司 Copyright ©2015 www.zhizuobiao.com,All Rights Reserved.
 沪公网安备 31011502005948号


 索取资料
索取资料

 答疑解惑
答疑解惑

 技术交流
技术交流

 职业测评
职业测评

 面试技巧
面试技巧

 高薪秘笈
高薪秘笈


