

-


移动开发
站-
热门城市 全国站>
-
其他省市
-
-

 15692118659
 小职
2021-06-23
来源 :「你要永远相信光z」原文链接:https://blog.csdn.net/weixin_427686
阅读 9086
评论 0
小职
2021-06-23
来源 :「你要永远相信光z」原文链接:https://blog.csdn.net/weixin_427686
阅读 9086
评论 0
摘要:本文主要介绍了android开发之android 仿微信demo-登录功能实现(移动端),通过具体的内容向大家展现,希望对大家android开发的学习有所帮助。
本文主要介绍了android开发之android 仿微信demo-登录功能实现(移动端),通过具体的内容向大家展现,希望对大家android开发的学习有所帮助。

移动端登录功能实现
登录功能基本和注册一样,唯一不同的是登录可以实现两种登录方式(微信号和手机号),也就是布局不一样。所以需要两个布局,两个activity(这个方法比较简单粗暴,我懒。也可以通过activity动态切换布局,这样只需要一个activity就可以了)
创建两个activity,实现两种登录方式
微信号登录activity
LoginUser.java
package com.example.wxchatdemo;
import android.annotation.SuppressLint;
import android.app.AlertDialog;
import android.content.Intent;
import android.graphics.Color;
import android.os.Build;
import android.os.Bundle;
import android.os.Handler;
import android.os.Message;
import android.support.v7.app.ActionBar;
import android.support.v7.app.AppCompatActivity;
import android.util.Log;
import android.view.View;
import android.widget.Button;
import android.widget.EditText;
import android.widget.ImageView;
import android.widget.TextView;
import android.widget.Toast;
import com.example.wxchatdemo.tools.IEditTextChangeListener;
import com.example.wxchatdemo.tools.WorksSizeCheckUtil;
import org.json.JSONObject;
import java.io.BufferedReader;
import java.io.BufferedWriter;
import java.io.InputStream;
import java.io.InputStreamReader;
import java.io.OutputStream;
import java.io.OutputStreamWriter;
import java.net.HttpURLConnection;
import java.net.URL;
import java.net.URLEncoder;
public class LoginUser extends AppCompatActivity {
//声明组件变量
private EditText weixinNumber;
private EditText password;
private TextView phone_login;
private Button button;
//自定义的一个Hander消息机制
private MyHander myhander = new MyHander();
@Override
public void onCreate(Bundle savedInstanceState) {
super.onCreate(savedInstanceState);
setContentView(R.layout.login_user); //设置布局
/* 隐藏自带标题*/
ActionBar actionBar = getSupportActionBar();
if (actionBar != null) {
actionBar.hide();
}
if (Build.VERSION.SDK_INT >= 21) {
View decorView = getWindow().getDecorView();
int option = View.SYSTEM_UI_FLAG_LAYOUT_FULLSCREEN //全屏显示
| View.SYSTEM_UI_FLAG_LAYOUT_STABLE
| View.SYSTEM_UI_FLAG_LIGHT_STATUS_BAR; //因为背景为浅色所以将状态栏字体设置为黑色
decorView.setSystemUiVisibility(option);
getWindow().setStatusBarColor(Color.TRANSPARENT);
}
initViews(); // 初始化布局元素
/*获取注册activity传过来的微信号*/
Intent intent = getIntent();
String number = intent.getStringExtra("weixin_number");
//把传过来的值显示在登录布局上
weixinNumber.setText(number);
// 设置注册按钮是否可点击
if (weixinNumber.getText() + "" == "" || password.getText() + "" == "") {
button.setEnabled(false);
} else {
button.setEnabled(true);
}
inputFocus(); //监听EditView变色
buttonChangeColor(); //登录按钮变色
// 设置手机号登录的监听器
phone_login.setOnClickListener(new View.OnClickListener() {
@Override
public void onClick(View v) {
//跳转到手机号登录的activity
Intent intent=new Intent(LoginUser.this,LoginPhone.class);
startActivity(intent);
}
});
//button的点击事件
button.setOnClickListener(new View.OnClickListener() {
@Override
public void onClick(View v) {
//创建一个进度条的activity,通过AndroidMainfest.xml文件声明为对话框,这样activity就不会覆盖当前的activity
Intent intent = new Intent();
intent.setClass(LoginUser.this, Loading.class);
startActivity(intent);
// 开一个线程完成网络请求操作
new Thread(new Runnable() {
@Override
public void run() {
try {
Thread.sleep(1000);
httpUrlConnPost(LoginUser.this.weixinNumber.getText() + "",
password.getText() + "");
} catch (InterruptedException e) {
e.printStackTrace();
}
}
}).start();
}
});
}
@SuppressLint("NewApi")
public void initViews() {
// 得到所有的组件
weixinNumber = (EditText) this.findViewById(R.id.log_weixin_number);
password = (EditText) this.findViewById(R.id.log_passwd);
phone_login = (TextView) this.findViewById(R.id.phone_log);
button = (Button) this.findViewById(R.id.log_button);
}
public void inputFocus() {
weixinNumber.setOnFocusChangeListener(new View.OnFocusChangeListener() {
@Override
public void onFocusChange(View v, boolean hasFocus) {
if (hasFocus) {
// 此处为得到焦点时的处理内容
ImageView imageView = (ImageView) findViewById(R.id.login_diver1);
imageView.setBackgroundResource(R.color.input_dvier_focus);
} else {
// 此处为失去焦点时的处理内容
ImageView imageView = (ImageView) findViewById(R.id.login_diver1);
imageView.setBackgroundResource(R.color.input_dvier);
}
}
});
password.setOnFocusChangeListener(new View.OnFocusChangeListener() {
@Override
public void onFocusChange(View v, boolean hasFocus) {
if (hasFocus) {
// 此处为得到焦点时的处理内容
ImageView imageView = (ImageView) findViewById(R.id.login_diver2);
imageView.setBackgroundResource(R.color.input_dvier_focus);
} else {
// 此处为失去焦点时的处理内容
ImageView imageView = (ImageView) findViewById(R.id.login_diver2);
imageView.setBackgroundResource(R.color.input_dvier);
}
}
});
}
public void buttonChangeColor() {
//创建工具类对象 把要改变颜色的Button先传过去
WorksSizeCheckUtil.textChangeListener textChangeListener = new WorksSizeCheckUtil.textChangeListener(button);
textChangeListener.addAllEditText(weixinNumber, password);//把所有要监听的EditText都添加进去
//接口回调 在这里拿到boolean变量 根据isHasContent的值决定 Button应该设置什么颜色
WorksSizeCheckUtil.setChangeListener(new IEditTextChangeListener() {
@Override
public void textChange(boolean isHasContent) {
if (isHasContent) {
button.setBackgroundResource(R.drawable.login_button_focus);
button.setTextColor(getResources().getColor(R.color.loginButtonTextFouse));
} else {
button.setBackgroundResource(R.drawable.login_button_shape);
button.setTextColor(getResources().getColor(R.color.loginButtonText));
}
}
});
}
// 发送请求的主要方法
public void httpUrlConnPost(String number, String password) {
HttpURLConnection urlConnection = null;
URL url;
try {
// 请求的URL地地址
url = new URL(
"//100.2.178.10:8080/AndroidServer_war_exploded/Login");
urlConnection = (HttpURLConnection) url.openConnection();// 打开http连接
urlConnection.setConnectTimeout(3000);// 连接的超时时间
urlConnection.setUseCaches(false);// 不使用缓存
// urlConnection.setFollowRedirects(false);是static函数,作用于所有的URLConnection对象。
urlConnection.setInstanceFollowRedirects(true);// 是成员函数,仅作用于当前函数,设置这个连接是否可以被重定向
urlConnection.setReadTimeout(3000);// 响应的超时时间
urlConnection.setDoInput(true);// 设置这个连接是否可以写入数据
urlConnection.setDoOutput(true);// 设置这个连接是否可以输出数据
urlConnection.setRequestMethod("POST");// 设置请求的方式
urlConnection.setRequestProperty("Content-Type",
"application/json;charset=UTF-8");// 设置消息的类型
urlConnection.connect();// 连接,从上述至此的配置必须要在connect之前完成,实际上它只是建立了一个与服务器的TCP连接
JSONObject json = new JSONObject();// 创建json对象
json.put("number", URLEncoder.encode(number, "UTF-8"));// 使用URLEncoder.encode对特殊和不可见字符进行编码
json.put("password", URLEncoder.encode(password, "UTF-8"));// 把数据put进json对象中
String jsonstr = json.toString();// 把JSON对象按JSON的编码格式转换为字符串
// ------------字符流写入数据------------
OutputStream out = urlConnection.getOutputStream();// 输出流,用来发送请求,http请求实际上直到这个函数里面才正式发送出去
BufferedWriter bw = new BufferedWriter(new OutputStreamWriter(out));// 创建字符流对象并用高效缓冲流包装它,便获得最高的效率,发送的是字符串推荐用字符流,其它数据就用字节流
bw.write(jsonstr);// 把json字符串写入缓冲区中
bw.flush();// 刷新缓冲区,把数据发送出去,这步很重要
out.close();
bw.close();// 使用完关闭
Log.i("aa", urlConnection.getResponseCode() + "");
//以下判斷是否訪問成功,如果返回的状态码是200则说明访问成功
if (urlConnection.getResponseCode() == HttpURLConnection.HTTP_OK) {// 得到服务端的返回码是否连接成功
// ------------字符流读取服务端返回的数据------------
InputStream in = urlConnection.getInputStream();
BufferedReader br = new BufferedReader(
new InputStreamReader(in));
String str = null;
StringBuffer buffer = new StringBuffer();
while ((str = br.readLine()) != null) {// BufferedReader特有功能,一次读取一行数据
buffer.append(str);
}
in.close();
br.close();
JSONObject rjson = new JSONObject(buffer.toString());
Log.i("aa", "rjson=" + rjson);// rjson={"json":true}
boolean result = rjson.getBoolean("json");// 从rjson对象中得到key值为"json"的数据,这里服务端返回的是一个boolean类型的数据
System.out.println("json:===" + result);
//如果服务器端返回的是true,则说明登录成功,否则登录失败
if (result) {// 判断结果是否正确
//在Android中http请求,必须放到线程中去作请求,但是在线程中不可以直接修改UI,只能通过hander机制来完成对UI的操作
myhander.sendEmptyMessage(1);
Log.i("用户:", "登录成功");
} else {
myhander.sendEmptyMessage(2);
System.out.println("222222222222222");
Log.i("用户:", "登录失败");
}
} else {
myhander.sendEmptyMessage(2);
}
} catch (Exception e) {
e.printStackTrace();
Log.i("aa", e.toString());
System.out.println("11111111111111111");
myhander.sendEmptyMessage(2);
} finally {
urlConnection.disconnect();// 使用完关闭TCP连接,释放资源
}
}
// 在Android中不可以在线程中直接修改UI,只能借助Handler机制来完成对UI的操作
class MyHander extends Handler {
@Override
public void handleMessage(Message msg) {
super.handleMessage(msg);
//判断hander的内容是什么,如果是1则说明登录成功,如果是2说明登录失败
switch (msg.what) {
case 1:
Log.i("aa", msg.what + "");
//提示
Toast.makeText(getApplicationContext(), "登录成功",
Toast.LENGTH_SHORT).show();
//通过Intent跳转到微信首页,把微信号传过去
Intent intent = new Intent();
intent.putExtra("weixin_number", weixinNumber.getText().toString());
intent.setClass(com.example.wxchatdemo.LoginUser.this,
com.example.wxchatdemo.MainWeixin.class);
startActivity(intent);
com.example.wxchatdemo.LoginUser.this.finish(); //结束当前actitivy
break;
case 2:
Log.i("aa", msg.what + "");
//对话框
new AlertDialog.Builder(com.example.wxchatdemo.LoginUser.this)
.setTitle(" 登录失败")
.setMessage(" 用户名或密码错误,请重新填写")
.setPositiveButton("确定", null)
.show();
break;
}
}
}
//返回按钮处理事件
public void login_activity_back(View v) {
/*跳转到微信启动页*/
Intent intent = new Intent();
intent.setClass(com.example.wxchatdemo.LoginUser.this, Welcome.class);
startActivity(intent);
com.example.wxchatdemo.LoginUser.this.finish(); //结束当前activity
}
}
微信号登录activity对应的布局文件
login_user.xml
<?xml version="1.0" encoding="utf-8"?>
<LinearLayout xmlns:android="//schemas.android.com/apk/res/android"
android:layout_width="match_parent"
android:layout_height="match_parent"
android:background="@color/title"
android:orientation="vertical">
<!--返回按钮-->
<ImageView
android:id="@+id/close"
android:layout_width="17dp"
android:layout_height="17dp"
android:layout_marginLeft="20dp"
android:layout_marginTop="45dp"
android:onClick="login_activity_back"
android:src="@drawable/backpay" />
<!--标题-->
<TextView
android:layout_width="match_parent"
android:layout_height="wrap_content"
android:layout_marginLeft="30dp"
android:layout_marginTop="45dp"
android:text="微信号/QQ号/邮箱登录"
android:textColor="@color/loginText"
android:textSize="25sp" />
<!--账号输入-->
<LinearLayout
android:layout_width="match_parent"
android:layout_height="wrap_content"
android:layout_marginTop="40dp">
<TextView
android:layout_width="wrap_content"
android:layout_height="wrap_content"
android:layout_marginLeft="30dp"
android:text="账号"
android:textColor="@color/loginText"
android:textSize="16sp" />
<EditText
android:id="@+id/log_weixin_number"
android:layout_width="200dp"
android:layout_height="wrap_content"
android:layout_marginLeft="55dp"
android:background="@null"
android:hint="请填写微信号/QQ号/邮箱"
android:singleLine="true"
android:textColorHint="@color/textColorHint"
android:textCursorDrawable="@drawable/edit_cursor_color"
android:textSize="16sp" />
</LinearLayout>
<!--下划线-->
<ImageView
android:id="@+id/login_diver1"
android:layout_width="320dp"
android:layout_height="1dp"
android:layout_gravity="center_horizontal"
android:layout_marginTop="17dp"
android:background="@color/input_dvier" />
<LinearLayout
android:layout_width="match_parent"
android:layout_height="wrap_content"
android:layout_marginTop="40dp">
<TextView
android:layout_width="wrap_content"
android:layout_height="wrap_content"
android:layout_marginLeft="30dp"
android:text="密码"
android:textColor="@color/loginText"
android:textSize="16sp" />
<EditText
android:id="@+id/log_passwd"
android:layout_width="200dp"
android:layout_height="wrap_content"
android:layout_marginLeft="55dp"
android:password="true"
android:background="@null"
android:hint="请填写密码"
android:singleLine="true"
android:textColorHint="@color/textColorHint"
android:textCursorDrawable="@drawable/edit_cursor_color"
android:textSize="16sp" />
</LinearLayout>
<!--下划线-->
<ImageView
android:id="@+id/login_diver2"
android:layout_width="320dp"
android:layout_height="1dp"
android:layout_gravity="center_horizontal"
android:layout_marginTop="17dp"
android:background="@color/input_dvier" />
<LinearLayout
android:layout_width="match_parent"
android:layout_height="wrap_content">
<TextView
android:id="@+id/phone_log"
android:layout_width="wrap_content"
android:layout_height="wrap_content"
android:layout_marginLeft="30dp"
android:layout_marginTop="30dp"
android:text="用手机号登录"
android:textColor="@color/massageLogin"
android:textSize="17dp" />
</LinearLayout>
<LinearLayout
android:layout_width="match_parent"
android:layout_height="wrap_content"
android:layout_marginTop="40dp"
android:gravity="center_horizontal">
<!--登录按钮-->
<Button
android:id="@+id/log_button"
android:layout_width="321dp"
android:layout_height="48dp"
android:background="@drawable/login_button_shape"
android:text="登录"
android:textColor="@color/loginButtonText"
android:textSize="16sp" />
</LinearLayout>
<LinearLayout
android:layout_width="match_parent"
android:layout_height="wrap_content"
android:layout_marginTop="300dp"
android:divider="@drawable/login_dvier"
android:gravity="center_horizontal"
android:showDividers="middle">
<TextView
android:layout_width="wrap_content"
android:layout_height="wrap_content"
android:paddingHorizontal="10dp"
android:text="找回密码"
android:textColor="@color/massageLogin"
android:textSize="14dp" />
<TextView
android:layout_width="wrap_content"
android:layout_height="wrap_content"
android:paddingHorizontal="10dp"
android:text="紧急冻结"
android:textColor="@color/massageLogin"
android:textSize="14dp" />
<TextView
android:layout_width="wrap_content"
android:layout_height="wrap_content"
android:paddingHorizontal="10dp"
android:text="微信安全中心"
android:textColor="@color/massageLogin"
android:textSize="14dp" />
</LinearLayout>
</LinearLayout>
手机号登录activity
LoginPhone.java
package com.example.wxchatdemo;
import android.annotation.SuppressLint;
import android.app.AlertDialog;
import android.content.Intent;
import android.graphics.Color;
import android.os.Build;
import android.os.Bundle;
import android.os.Handler;
import android.os.Message;
import android.support.v7.app.ActionBar;
import android.support.v7.app.AppCompatActivity;
import android.util.Log;
import android.view.View;
import android.widget.Button;
import android.widget.EditText;
import android.widget.ImageView;
import android.widget.TextView;
import android.widget.Toast;
import com.example.wxchatdemo.tools.IEditTextChangeListener;
import com.example.wxchatdemo.tools.WorksSizeCheckUtil;
import org.json.JSONObject;
import java.io.BufferedReader;
import java.io.BufferedWriter;
import java.io.InputStream;
import java.io.InputStreamReader;
import java.io.OutputStream;
import java.io.OutputStreamWriter;
import java.net.HttpURLConnection;
import java.net.URL;
import java.net.URLEncoder;
public class LoginPhone extends AppCompatActivity {
//声明组件变量
private EditText phone;
private EditText password;
private TextView user_login;
private Button button;
//自定义的一个Hander消息机制
private LoginPhone.MyHander myhander = new LoginPhone.MyHander();
@Override
public void onCreate(Bundle savedInstanceState) {
super.onCreate(savedInstanceState);
setContentView(R.layout.login_phone); //设置布局
/* 隐藏自带标题*/
ActionBar actionBar = getSupportActionBar();
if (actionBar != null) {
actionBar.hide();
}
if (Build.VERSION.SDK_INT >= 21) {
View decorView = getWindow().getDecorView();
int option = View.SYSTEM_UI_FLAG_LAYOUT_FULLSCREEN //全屏显示
| View.SYSTEM_UI_FLAG_LAYOUT_STABLE
| View.SYSTEM_UI_FLAG_LIGHT_STATUS_BAR; //因为背景为浅色所以将状态栏字体设置为黑色
decorView.setSystemUiVisibility(option);
getWindow().setStatusBarColor(Color.TRANSPARENT);
}
initViews(); // 初始化布局元素
// 设置注册按钮是否可点击
if (phone.getText() + "" == "" || password.getText() + "" == "") {
button.setEnabled(false);
} else {
button.setEnabled(true);
}
inputFocus(); //监听EditView变色
buttonChangeColor(); //登录按钮变色
//设置通过微信号登录的监听器
user_login.setOnClickListener(new View.OnClickListener() {
@Override
public void onClick(View v) {
//跳转到用微信号登录的activity
Intent intent = new Intent(LoginPhone.this, LoginUser.class);
startActivity(intent);
}
});
//button的点击事件
button.setOnClickListener(new View.OnClickListener() {
@Override
public void onClick(View v) {
//创建一个进度条的activity,通过AndroidMainfest.xml文件声明为对胡框,这样activity就不会覆盖当前的activity
Intent intent = new Intent();
intent.setClass(LoginPhone.this, Loading.class);
startActivity(intent);
// 开一个线程完成网络请求操作
new Thread(new Runnable() {
@Override
public void run() {
try {
Thread.sleep(1000);
httpUrlConnPost(LoginPhone.this.phone.getText() + "",
password.getText() + "");
} catch (InterruptedException e) {
e.printStackTrace();
}
}
}).start();
}
});
}
@SuppressLint("NewApi")
public void initViews() {
// 得到所有的组件
phone = (EditText) this.findViewById(R.id.log_phone);
password = (EditText) this.findViewById(R.id.log_passwd);
user_login = (TextView) this.findViewById(R.id.user_log);
button = (Button) this.findViewById(R.id.log_button);
}
public void inputFocus() {
phone.setOnFocusChangeListener(new View.OnFocusChangeListener() {
@Override
public void onFocusChange(View v, boolean hasFocus) {
if (hasFocus) {
// 此处为得到焦点时的处理内容
ImageView imageView = (ImageView) findViewById(R.id.login_diver1);
imageView.setBackgroundResource(R.color.input_dvier_focus);
} else {
// 此处为失去焦点时的处理内容
ImageView imageView = (ImageView) findViewById(R.id.login_diver1);
imageView.setBackgroundResource(R.color.input_dvier);
}
}
});
password.setOnFocusChangeListener(new View.OnFocusChangeListener() {
@Override
public void onFocusChange(View v, boolean hasFocus) {
if (hasFocus) {
// 此处为得到焦点时的处理内容
ImageView imageView = (ImageView) findViewById(R.id.login_diver2);
imageView.setBackgroundResource(R.color.input_dvier_focus);
} else {
// 此处为失去焦点时的处理内容
ImageView imageView = (ImageView) findViewById(R.id.login_diver2);
imageView.setBackgroundResource(R.color.input_dvier);
}
}
});
}
public void buttonChangeColor() {
//创建工具类对象 把要改变颜色的Button先传过去
WorksSizeCheckUtil.textChangeListener textChangeListener = new WorksSizeCheckUtil.textChangeListener(button);
textChangeListener.addAllEditText(phone, password);//把所有要监听的EditText都添加进去
//接口回调 在这里拿到boolean变量 根据isHasContent的值决定 Button应该设置什么颜色
WorksSizeCheckUtil.setChangeListener(new IEditTextChangeListener() {
@Override
public void textChange(boolean isHasContent) {
if (isHasContent) {
button.setBackgroundResource(R.drawable.login_button_focus);
button.setTextColor(getResources().getColor(R.color.loginButtonTextFouse));
} else {
button.setBackgroundResource(R.drawable.login_button_shape);
button.setTextColor(getResources().getColor(R.color.loginButtonText));
}
}
});
}
// 发送请求的主要方法
public void httpUrlConnPost(String phone, String password) {
HttpURLConnection urlConnection = null;
URL url;
try {
// 请求的URL地地址
url = new URL(
"//100.2.178.10:8080/AndroidServer_war_exploded/Login");
urlConnection = (HttpURLConnection) url.openConnection();// 打开http连接
urlConnection.setConnectTimeout(3000);// 连接的超时时间
urlConnection.setUseCaches(false);// 不使用缓存
// urlConnection.setFollowRedirects(false);是static函数,作用于所有的URLConnection对象。
urlConnection.setInstanceFollowRedirects(true);// 是成员函数,仅作用于当前函数,设置这个连接是否可以被重定向
urlConnection.setReadTimeout(3000);// 响应的超时时间
urlConnection.setDoInput(true);// 设置这个连接是否可以写入数据
urlConnection.setDoOutput(true);// 设置这个连接是否可以输出数据
urlConnection.setRequestMethod("POST");// 设置请求的方式
urlConnection.setRequestProperty("Content-Type",
"application/json;charset=UTF-8");// 设置消息的类型
urlConnection.connect();// 连接,从上述至此的配置必须要在connect之前完成,实际上它只是建立了一个与服务器的TCP连接
JSONObject json = new JSONObject();// 创建json对象
json.put("number", URLEncoder.encode(phone, "UTF-8"));// 使用URLEncoder.encode对特殊和不可见字符进行编码
json.put("password", URLEncoder.encode(password, "UTF-8"));// 把数据put进json对象中
String jsonstr = json.toString();// 把JSON对象按JSON的编码格式转换为字符串
// ------------字符流写入数据------------
OutputStream out = urlConnection.getOutputStream();// 输出流,用来发送请求,http请求实际上直到这个函数里面才正式发送出去
BufferedWriter bw = new BufferedWriter(new OutputStreamWriter(out));// 创建字符流对象并用高效缓冲流包装它,便获得最高的效率,发送的是字符串推荐用字符流,其它数据就用字节流
bw.write(jsonstr);// 把json字符串写入缓冲区中
bw.flush();// 刷新缓冲区,把数据发送出去,这步很重要
out.close();
bw.close();// 使用完关闭
Log.i("aa", urlConnection.getResponseCode() + "");
//以下判斷是否訪問成功,如果返回的状态码是200则说明访问成功
if (urlConnection.getResponseCode() == HttpURLConnection.HTTP_OK) {// 得到服务端的返回码是否连接成功
// ------------字符流读取服务端返回的数据------------
InputStream in = urlConnection.getInputStream();
BufferedReader br = new BufferedReader(
new InputStreamReader(in));
String str = null;
StringBuffer buffer = new StringBuffer();
while ((str = br.readLine()) != null) {// BufferedReader特有功能,一次读取一行数据
buffer.append(str);
}
in.close();
br.close();
JSONObject rjson = new JSONObject(buffer.toString());
Log.i("aa", "rjson=" + rjson);// rjson={"json":true}
boolean result = rjson.getBoolean("json");// 从rjson对象中得到key值为"json"的数据,这里服务端返回的是一个boolean类型的数据
System.out.println("json:===" + result);
//如果服务器端返回的是true,则说明登录成功,否则登录失败
if (result) {// 判断结果是否正确
//在Android中http请求,必须放到线程中去作请求,但是在线程中不可以直接修改UI,只能通过hander机制来完成对UI的操作
myhander.sendEmptyMessage(1);
Log.i("用户:", "登录成功");
} else {
myhander.sendEmptyMessage(2);
System.out.println("222222222222222");
Log.i("用户:", "登录失败");
}
} else {
myhander.sendEmptyMessage(2);
}
} catch (Exception e) {
e.printStackTrace();
Log.i("aa", e.toString());
System.out.println("11111111111111111");
myhander.sendEmptyMessage(2);
} finally {
urlConnection.disconnect();// 使用完关闭TCP连接,释放资源
}
}
// 在Android中不可以在线程中直接修改UI,只能借助Handler机制来完成对UI的操作
class MyHander extends Handler {
@Override
public void handleMessage(Message msg) {
super.handleMessage(msg);
//判断hander的内容是什么,如果是1则说明登录成功,如果是2说明登录失败
switch (msg.what) {
case 1:
Log.i("aa", msg.what + "");
Toast.makeText(getApplicationContext(), "登录成功",
Toast.LENGTH_SHORT).show();
Intent intent = new Intent (com.example.wxchatdemo.LoginPhone.this, com.example.wxchatdemo.MainWeixin.class);
startActivity(intent);
com.example.wxchatdemo.LoginPhone.this.finish();
break;
case 2:
Log.i("aa", msg.what + "");
new AlertDialog.Builder(com.example.wxchatdemo.LoginPhone.this)
.setTitle(" 登录失败")
.setMessage(" 用户名或密码错误,请重新填写")
.setPositiveButton("确定", null)
.show();
}
}
}
//返回按钮处理事件
public void login_activity_back(View v) {
/*跳转到微信启动页*/
Intent intent = new Intent();
intent.setClass(com.example.wxchatdemo.LoginPhone.this, Welcome.class);
startActivity(intent);
com.example.wxchatdemo.LoginPhone.this.finish(); //结束当前activity
}
}
手机号登录activity对应的布局文件
login_phone.xml
<?xml version="1.0" encoding="utf-8"?>
<LinearLayout xmlns:android="//schemas.android.com/apk/res/android"
android:layout_width="match_parent"
android:layout_height="match_parent"
android:background="@color/title"
android:orientation="vertical">
<!--返回按钮-->
<ImageView
android:id="@+id/close"
android:layout_width="17dp"
android:layout_height="17dp"
android:layout_marginLeft="20dp"
android:layout_marginTop="45dp"
android:onClick="login_activity_back"
android:src="@drawable/backpay" />
<!--标题-->
<TextView
android:layout_width="match_parent"
android:layout_height="wrap_content"
android:layout_marginLeft="30dp"
android:layout_marginTop="45dp"
android:text="手机号登录"
android:textColor="@color/loginText"
android:textSize="25sp" />
<!--账号输入-->
<LinearLayout
android:layout_width="match_parent"
android:layout_height="wrap_content"
android:layout_marginTop="40dp">
<TextView
android:layout_width="wrap_content"
android:layout_height="wrap_content"
android:layout_marginLeft="30dp"
android:text="手机号"
android:textColor="@color/loginText"
android:textSize="16sp" />
<EditText
android:id="@+id/log_phone"
android:layout_width="200dp"
android:layout_height="wrap_content"
android:layout_marginLeft="35dp"
android:background="@null"
android:hint="请填写手机号"
android:singleLine="true"
android:textColorHint="@color/textColorHint"
android:textCursorDrawable="@drawable/edit_cursor_color"
android:textSize="16sp" />
</LinearLayout>
<!--下划线-->
<ImageView
android:id="@+id/login_diver1"
android:layout_width="320dp"
android:layout_height="1dp"
android:layout_gravity="center_horizontal"
android:layout_marginTop="17dp"
android:background="@color/input_dvier" />
<LinearLayout
android:layout_width="match_parent"
android:layout_height="wrap_content"
android:layout_marginTop="40dp">
<TextView
android:layout_width="wrap_content"
android:layout_height="wrap_content"
android:layout_marginLeft="30dp"
android:text="密码"
android:textColor="@color/loginText"
android:textSize="16sp" />
<EditText
android:id="@+id/log_passwd"
android:layout_width="200dp"
android:layout_height="wrap_content"
android:password="true"
android:layout_marginLeft="55dp"
android:background="@null"
android:hint="请填写密码"
android:singleLine="true"
android:textColorHint="@color/textColorHint"
android:textCursorDrawable="@drawable/edit_cursor_color"
android:textSize="16sp" />
</LinearLayout>
<!--下划线-->
<ImageView
android:id="@+id/login_diver2"
android:layout_width="320dp"
android:layout_height="1dp"
android:layout_gravity="center_horizontal"
android:layout_marginTop="17dp"
android:background="@color/input_dvier" />
<LinearLayout
android:layout_width="match_parent"
android:layout_height="wrap_content">
<TextView
android:id="@+id/user_log"
android:layout_width="wrap_content"
android:layout_height="wrap_content"
android:layout_marginLeft="30dp"
android:layout_marginTop="30dp"
android:text="用微信号/QQ号/邮箱登录"
android:textColor="@color/massageLogin"
android:textSize="17dp" />
</LinearLayout>
<LinearLayout
android:layout_width="match_parent"
android:layout_height="wrap_content"
android:layout_marginTop="40dp"
android:gravity="center_horizontal">
<!--登录按钮-->
<Button
android:id="@+id/log_button"
android:layout_width="321dp"
android:layout_height="48dp"
android:background="@drawable/login_button_shape"
android:text="登录"
android:textColor="@color/loginButtonText"
android:textSize="16sp" />
</LinearLayout>
<LinearLayout
android:layout_width="match_parent"
android:layout_height="wrap_content"
android:layout_marginTop="150dp"
android:divider="@drawable/login_dvier"
android:gravity="center_horizontal"
android:showDividers="middle">
<TextView
android:layout_width="wrap_content"
android:layout_height="wrap_content"
android:paddingHorizontal="10dp"
android:text="找回密码"
android:textColor="@color/massageLogin"
android:textSize="14dp" />
<TextView
android:layout_width="wrap_content"
android:layout_height="wrap_content"
android:paddingHorizontal="10dp"
android:text="紧急冻结"
android:textColor="@color/massageLogin"
android:textSize="14dp" />
<TextView
android:layout_width="wrap_content"
android:layout_height="wrap_content"
android:paddingHorizontal="10dp"
android:text="微信安全中心"
android:textColor="@color/massageLogin"
android:textSize="14dp" />
</LinearLayout>
</LinearLayout>
创建一个shapre文件login_dvier.xml,自定义竖直分割线
login_dvier.xml
<?xml version="1.0" encoding="utf-8"?>
<shape xmlns:android="//schemas.android.com/apk/res/android" >
<solid android:color="@color/login_dvier" />
<size android:height="1dp"></size>
<size android:width="1dp"></size>
</shape>
上面两个登录activity都实现了一个自定义的等待框activity,当点击登录按钮时,便会跳转到这个activity,但是自定义的activity会覆盖原有的界面。而微信点击登录按钮后会弹出一个等待框且不会覆盖原有的activity(即原有界面),所以要给自定义的等待框activity在Androidfest.xml文件配置为对话框,这样就不会覆盖原有activity.
创建activity Loading.java ,实现自定义等待框
Loading.java
package com.example.wxchatdemo;
import android.app.Activity;
import android.os.Bundle;
import android.os.Handler;
public class Loading extends Activity {
@Override
public void onCreate(Bundle savedInstanceState) {
// TODO Auto-generated method stub
super.onCreate(savedInstanceState);
setContentView(R.layout.loading); //设置布局
//一秒后结束当前activity
new Handler().postDelayed(new Runnable() {
@Override
public void run() {
Loading.this.finish();
}
}, 1000);
}
}
创建 activity Loading.java对应的布局文件loading.xml
loading.xml
<RelativeLayout xmlns:android="//schemas.android.com/apk/res/android"
android:layout_width="match_parent"
android:layout_height="match_parent">
<RelativeLayout
android:layout_width="180dp"
android:layout_height="180dp"
android:layout_centerInParent="true"
android:background="@drawable/loading_bg">
<LinearLayout
android:layout_width="fill_parent"
android:layout_height="fill_parent"
android:gravity="center"
android:orientation="vertical">
<ProgressBar
android:id="@+id/progressBar1"
style="?android:attr/progressBarStyleLarge"
android:layout_width="wrap_content"
android:layout_height="wrap_content"
android:layout_gravity="center_horizontal" />
<TextView
android:layout_width="wrap_content"
android:layout_height="wrap_content"
android:layout_marginTop="10dp"
android:text="正在登录"
android:textColor="#fff"
android:textSize="20sp" />
</LinearLayout>
</RelativeLayout>
</RelativeLayout>
在AndroidMainfest.xml文件中配置自定义等待框activity Loading.java 为对话框
<activity
android:name=".Loading"
android:theme="@style/MyDialogStyle" />
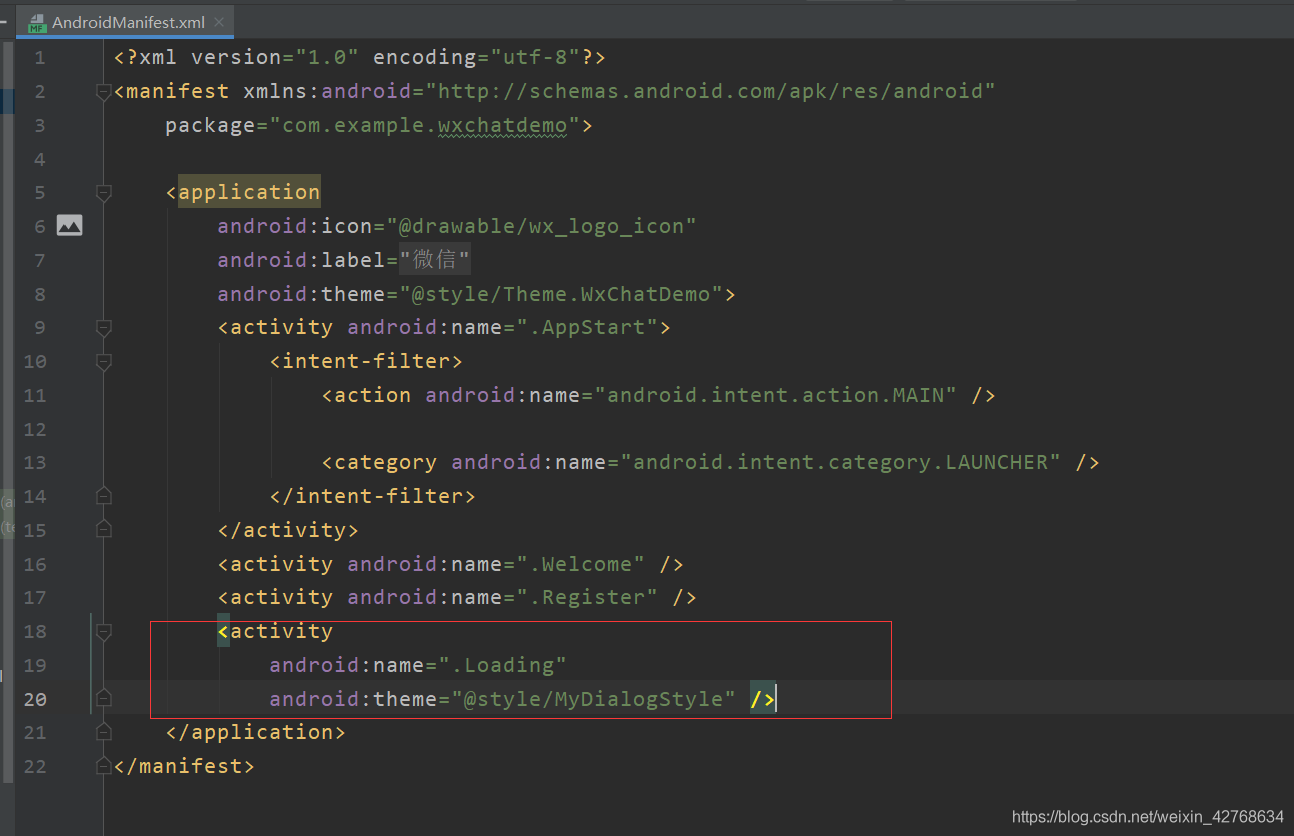
上面用到的主题theme是自定义的主题,把activity转化为对话框,这样就不会覆盖原有的activity,下面会给出如何定义自定义主题
创建样式styles.xml文件,实现自定义主题
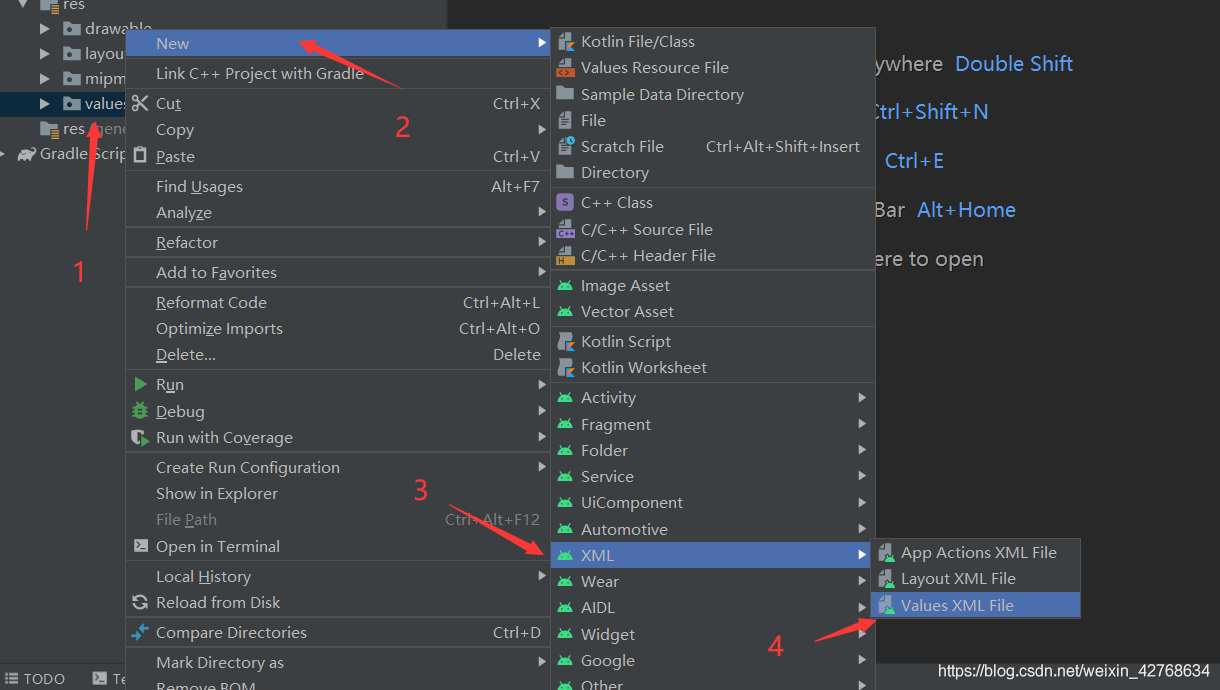
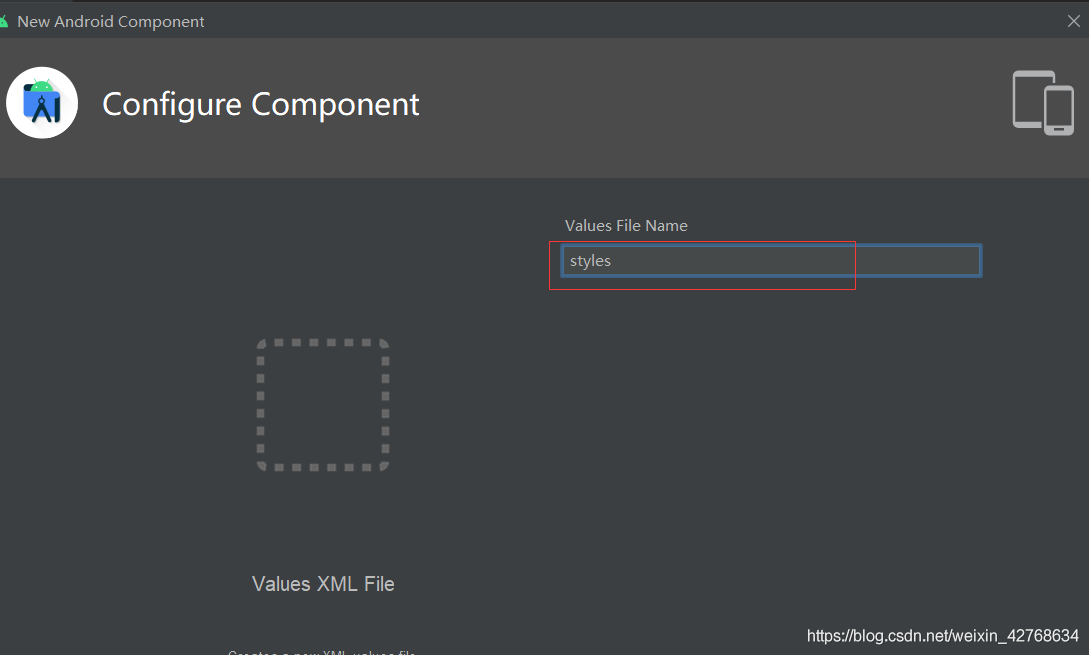
styles.xml
<?xml version="1.0" encoding="utf-8"?>
<resources>
<style name="MyDialogStyle">
<item name="android:windowBackground">@android:color/transparent</item>
<item name="android:windowFrame">@null</item>
<item name="android:windowNoTitle">true</item>
<item name="android:windowIsFloating">true</item>
<item name="android:windowIsTranslucent">true</item>
<item name="android:windowContentOverlay">@null</item>
<item name="android:windowAnimationStyle">@android:style/Animation.Dialog</item>
<item name="android:backgroundDimEnabled">true</item>
</style>
</resources>
在colors.xml声明用到的颜色
colors.xml
<color name="massageLogin">#5A6A8B</color>
<color name="login_dvier">#BEBEBE</color>
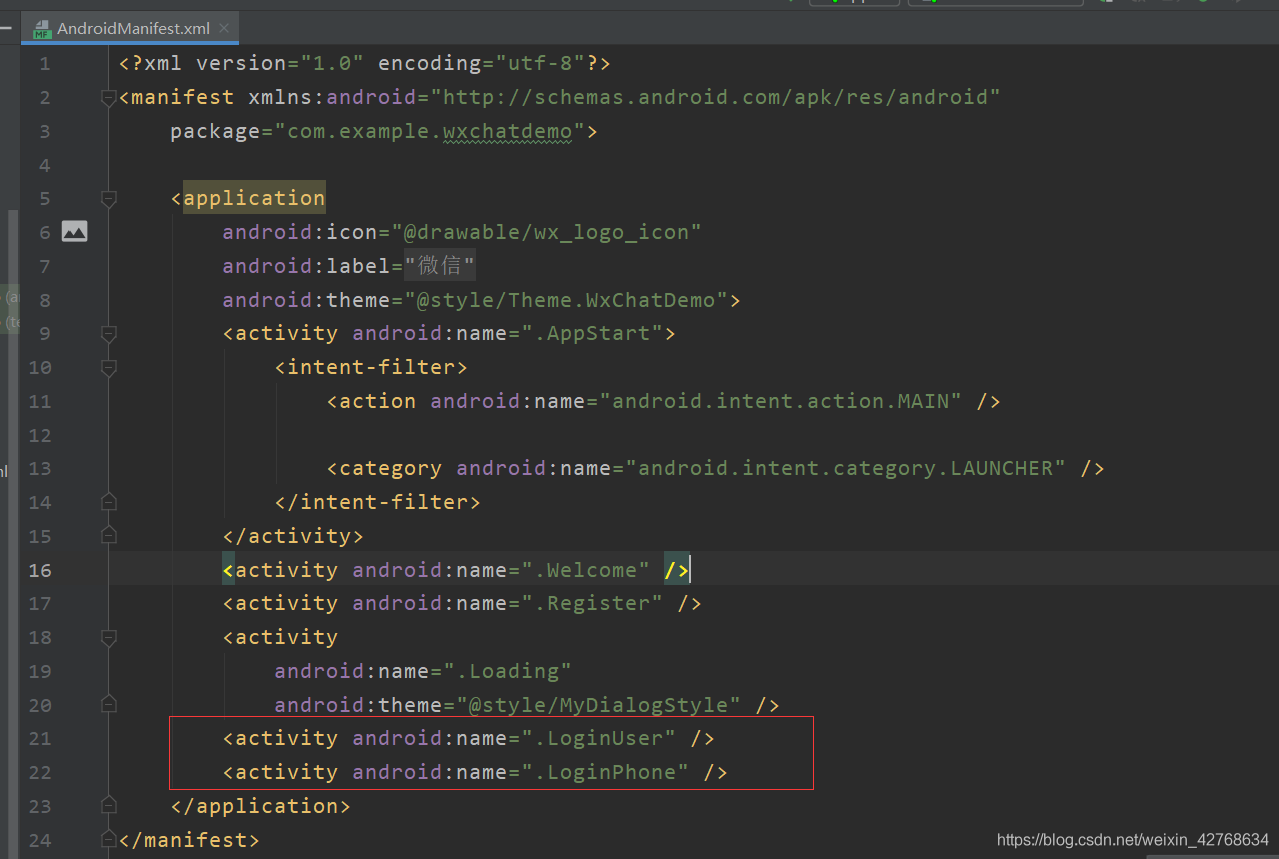
在AndroidMainfest.xml文件中声明创建的activity
测试
虽然服务端登录表单处理功能还没写,但是还是可以测试上面的效果
把以往文章中点击登陆按钮注释代码取消注释

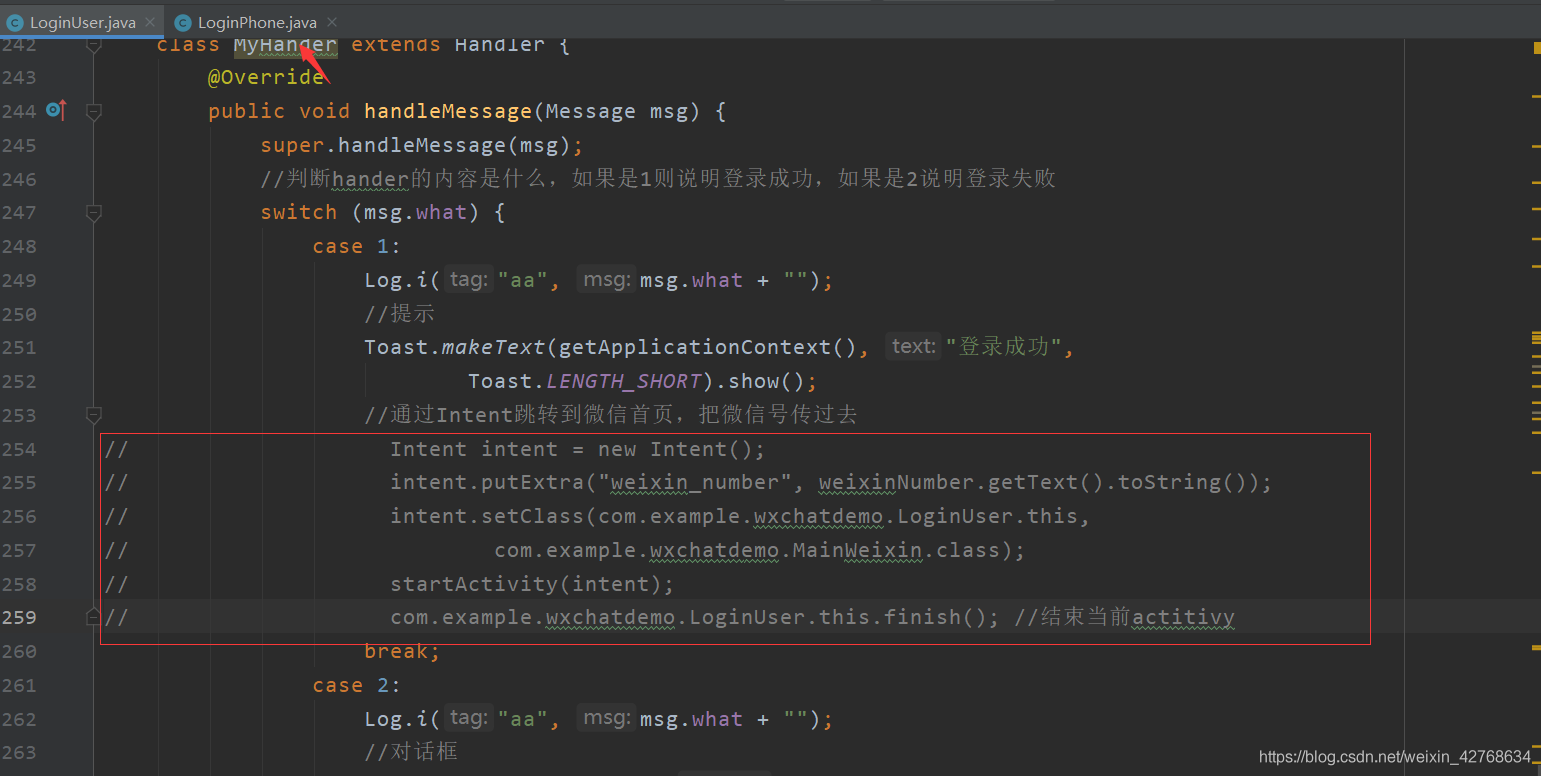
把两个activity登录成功后跳转activity那段代码段注释掉,启动项目测试

我是小职,记得找我
✅ 解锁高薪工作
✅ 免费获取基础课程·答疑解惑·职业测评

 喜欢 | 0
 不喜欢 | 0


您输入的评论内容中包含违禁敏感词
我知道了

请输入正确的手机号码
请输入正确的验证码
您今天的短信下发次数太多了,明天再试试吧!
我们会在第一时间安排职业规划师联系您!
您也可以联系我们的职业规划师咨询:

版权所有 职坐标-一站式AI+学习就业服务平台 沪ICP备13042190号-4
上海海同信息科技有限公司 Copyright ©2015 www.zhizuobiao.com,All Rights Reserved.
 沪公网安备 31011502005948号


 资料领取
资料领取

 答疑解惑
答疑解惑

 技术交流
技术交流

 职业测评
职业测评

 面试技巧
面试技巧

 高薪秘笈
高薪秘笈


